
 Machine Learning is, at the time of writing, a hot topic in the tech world and especially among software developers. Its integration in mobile apps is now easier to reach thanks to the launch of Core ML (exclusively for iOS) first in 2017 and Google’s ML Kit one year later. We spent some time researching both platforms and their features so that if you are wondering how do they work, this is what it looks like.
Let’s put some background first.
For those who don’t know, Machine Learning is considered a subset of Artificial Intelligence that constitutes a grouping of algorithms that allow systems to learn and improve from data without being explicitly programmed.
It focuses on prediction operations based on known properties so that its methodology could be summarized in “based on what I know, what you’re giving me is this (result), and I’m x% sure.” In order to perform these predictions, it’s use what is called a Machine Learning Model which is basically the result of training the learning algorithm with sample data.
Now, let’s see how mobile big players like Google and Apple help developers to get a hand of this tech on their platforms.
Core ML
Core ML is Apple’s framework for Machine Learning integration in iOS apps. It is built on top of already existing low-level technologies like Accelerate, BNNS, as well as Metal Performance Shaders.
Built above it, there are higher-level frameworks that work with specific domain tasks like Vision for image analysis (faces, barcodes, and objects) and live recognitions, Natural Language for text and speech recognition (supports already existing Natural Language processing models, NLP’s), and GamePlayKit (AI, pathfinding, agent behavior) for evaluating decision trees.
The models that Apple provides out of the box are several and ready to be used (also free), from detecting the dominant objects present in an image to detecting the scene of an image from a finite number of categories such as bedroom, forest, coast, and more. These models are stored and work on the client side, so that results are near real-time as there is no network latency and also a server is not needed for them to run. In terms of security, the fact that there is no need of connecting to a remote server means that none of the inputs or outputs related by the model used are sent away from the device and, in consequence, no one can externally grab that information.
Another feature of those models is that they’re optimized for on-device performance, which minimizes memory and power consumption. Unfortunately, having everything local clearly brings an increase in the size of the application (there’s a workaround for the size problem using CloudKit, storing the models to download them on-demand and allowing updates without the need of updating the app itself).
Moving on with how to put it to work and as we are going to show below, using a model to predict something is just a matter of a few lines of code.
Getting started with Core ML
The first step is to download the model, choosing between the ones from Apple’s Developer site, or using a customized one from any other ML toolbox such as TensorFlow or Keras (in order for them to work you need to convert them into Core ML format “.mlmodel”, something easy to achieve as Apple provides tools to do it ). A fully open source API to export and create models is available, with support for standard model formats that can be translated to the one used in iOS. There are also tools that allow you to reduce the size of big size models (some scenarios can go from 500MB down to 5MB).
The next step is to import the model into your Xcode project: this automatically generates all the necessary Interfaces to interact with the model, ready to be used as soon as you instantiate it and call the prediction(..) method.
For instance, if you’d like to work with every model out of the box, the code would be:
What you are doing here is using the model with the input values that it needs, being images in this case and receiving all the results (Output) that the model detected with the corresponding input. We built a basic app in order to try them with the ease of taking a picture and then analyze it with the model of choice, and here is the result:
As you select a model the objects are listed below from the one that has more probability of being in the image, to the one that has less. The percentage of probability and its accuracy is something that ML developers work hard on, and this varies with each model. Let’s move on now with Google’s framework.
ML Kit
ML Kit is a mobile SDK that Google provides to allow Machine Learning integration in mobile apps. It’s a Firebase based framework, optimized for mobile that works both in iOS and Android with all of its features.
Something to highlight about this framework is that includes a very broad set of out of the box API’s that already solve the most common problems in Machine Learning. These models are handled internally by the default dependency manager of Android apps called Gradle, with no need to worry about getting them and they keep being updated automatically over time. Here we have a huge difference with Core ML where in order to maintain a model up to date you are required to upgrade the entire application, manually. ML Kit also supports third-party models, but the available sources are limited to TensorFlow Lite models for now.
As soon as we get into the Firebase platform we came across a friendly interface where the available models are listed, being Text Recognition, Face Recognition, Image Labeling, Barcode Scanning, Emblematic Places Recognition, Language Recognition, and Smart Replies. Besides, in Google IO 2019 conference which took place from May 7 to May 9, it was announced the implementation of AutoML Vision Edge in ML Kit. This new feature allows devs to train their own custom Machine Learning models with ease, in regards to the image labeling field.
One thing to notice about ML Kit models is that some of them are available to work in the cloud improving drastically the accuracy and the number of categories to classify from (this service is free only for a small number of requests), others exclusively allow on-device processing whereas Text Recognition and Image Labeling are the only ones that work both cloud and client-side.
Getting started with ML Kit
To run a model using ML Kit (we’re going to use Android as an example, but the process is quite similar for iOS) we need to set up a project in the Firebase platform and connect it to your chosen app.
Once is everything set, the next step is to add the Firebase SDK dependency manager (Gradle) into the application itself. This will vary depending on the specific model/feature you wish to use, but they all share the same package base.
Having this done, it just a matter of including the Model class, then configuring it with the options needed, and calling the processImage method as its shown in the code below:
In order to test the models that ML Kit provides, we worked with a demo project that comes out of the box. We recorded the same objects used above with Core ML focusing on the Image Labeling model as it’s the one that looks more similar to the way that Apple’s framework recognizes objects but identifying them live and showing the results on the screen.
Because it is a live recording, those results are not fixed being constantly updated, and this is how it looks like:
Here is a closer look: 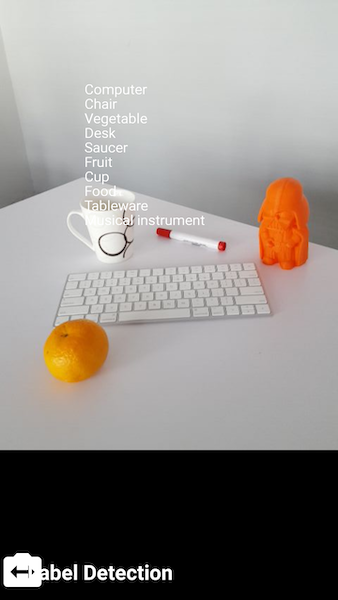
Final thoughts
In this post, we focused on object detection with image inputs in both Core ML and ML Kit. However, Machine Learning can be applied to other types of entries such as texts, numbers or even sounds, returning also the same variety of outputs.
This brings interesting possibilities like recognizing credit cards for fast payments or decoding messages for chatbots and AI implementations.
As from our experience, using an existing ML model in both platforms requires basic mobile programming knowledge and integration time. Both platforms put a lot of effort encapsulating the mathematical complexity of the model’s algorithms and providing out of the box models to solve the most common problems. But if you need to create a custom model fitted for very specific needs, then the required amount of knowledge both in maths and coding escalates quickly.
Are you thinking of implementing Machine Learning in your next mobile project? We would love to help!